How to configure a Cisco Router?
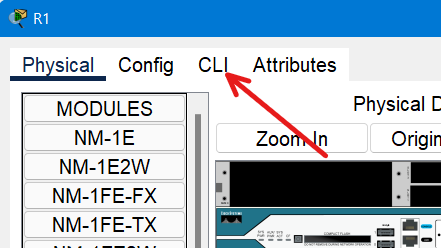
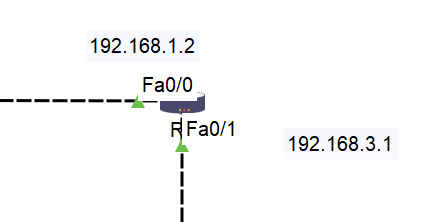
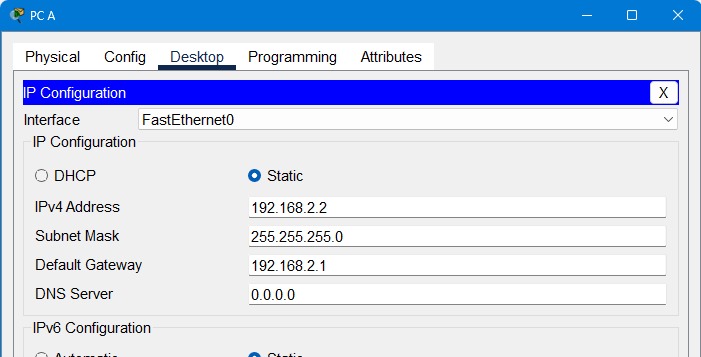
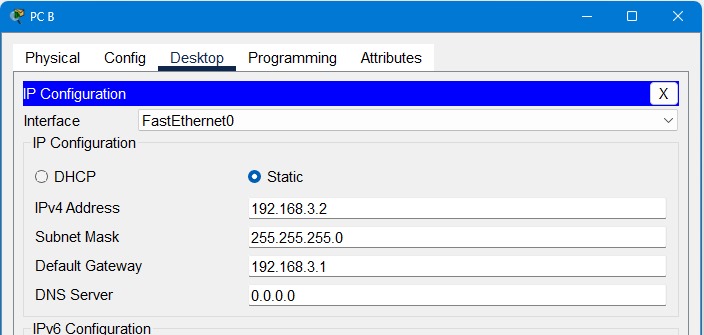
In this blog, we will discuss about how you can Configure a Cisco Router. Router, an essential network device that connects two or more packet-switched networks or subnetworks, is something that every network engineer must become familiar with. Cisco routers are world-famous for their advanced analytics, application optimization, automated provisioning, and integrated security capabilities that deliver users with a complete and proven solution. You can find Cisco routers for networks of all types and sizes in the market, but first, it’s crucial to understand which router series will serve your purpose. You can view all routers by Cisco here. Cisco router functions – They serve two primary functions that are: There are different types of routers to serve these two primary functions, such as a wireless router and a wired router. Also, many specialized types of routers serve specific functions like a core router, edge router, and virtual router. Here are different types of Cisco routers: It uses an ethernet cable to connect to a modem. A wireless router converts packets from binary code into radio signals and then wirelessly broadcasts them using antennae. Wireless routers create WLANs that connect multiple devices using wireless communication. Wired routers are similar to wireless routers that use an ethernet cable to connect to a modem. They create LANs using separate cables to connect to one or more devices within the network and then to the Internet. Core routers come in handy to large corporations and businesses that transmit a high volume of data packets within their network. They operate at the network’s internet backbone or “core” and do not communicate with external networks. An edge router communicates with both core routers and external networks, unlike core routers. They are placed at the “edge” of a network and use the BGP to send and receive data from other LANs and WANs. A router that performs the same function as a standard hardware router but is a software application is called a Virtual router. In this article, we will discuss how to Configure a Cisco Router by using basic networking commands. After reading this article, you would be able to do some basic configurations on a router manufactured by Cisco. To perform and explain the configurations on a router, we will use Packet Tracer Network Simulator software provided officially by Cisco. You can practice these commands by installing Packet Tracer in your devices or using a real Cisco router. There is no difference between both methods as long as your selected simulator contains the commands we are using in this tutorial. So, here is how you configure a Cisco router by using Cisco Packet Tracer. To configure a Cisco router you need to create a lab in the Packet Tracer first as shown below: This is just a practice lab, and it will not affect any network configuration on your device. It is not mandatory to use the same topology; you can modify it according to your wish. However, it is recommended to use the same to understand the commands explained more clearly. Access the CLI (Command Line Interface) by clicking on Router 1. Say no when asked if you would like to enter the initial configuration dialog of the router. Good To Remember: There are various command modes, and following are the some of the main command modes: 1) User EXEC Mode Router> 2) Privileged EXEC Mode Router# 3) Global Configuration Mode Router(config)# 4) Interface Configuration Mode Router(config-if)# 5) Sub Interface Configuration Mode Router(config-subif)# To enter the Privileged EXEC Mode, you have to use the command ‘enable’ in the CLI of Router 1. Router>enable Router# Switch to the Global Configuration Mode by using the command ‘configure terminal’ in the Privileged EXEC Mode. Router#configure terminal Enter configuration commands, one per line. End with CNTL/Z. Router(config)# Change the default router name from ‘Router’ to ‘R1’. You can configure any desired name on the router as per the topology you’re creating. This helps you to differentiate the device from other devices in the network. The command to change name is ‘hostname name’. Router(config)#hostname R1 Assign IP Addresses to the interfaces of Router 1. Assigning IP to the router is very important and is required to make your router be able to forward packets from/to networks. I am configuring 192.168.1.1 and 192.168.2.1 on interface fa 0/1 and fa 0/0, respectively. Commands to configure IP Address and make the interface fa 0/1 up: R1(config)# R1(config)#interface fa 0/1 R1(config-if)#ip address 192.168.1.1 255.255.255.0 R1(config-if)#no shutdown R1(config-if)# %LINK-5-CHANGED: Interface FastEthernet0/1, changed state to up Commands to configure IP Address and make the interface fa 0/0 up: R1(config)# R1(config)#interface fa 0/0 R1(config-if)#ip address 192.168.2.1 255.255.255.0 R1(config-if)#no shutdown R1(config-if)# %LINK-5-CHANGED: Interface FastEthernet0/0, changed state to up Assign the IP Address on the interfaces of Router 2. I am configuring 192.168.1.2 and 192.168.3.1 on interface fa 0/0 and fa 0/1, respectively. Commands to configure IP Address and make the interface fa 0/0 up: R2(config)# R2(config)#interface fa 0/0 R2(config-if)#ip address 192.168.1.2 255.255.255.0 R2(config-if)#no shutdown R2(config-if)# %LINK-5-CHANGED: Interface FastEthernet0/1, changed state to up Commands to configure IP Address and make the interface fa 0/1 up: R2(config)# R2(config)#interface fa 0/1 R2(config-if)#ip address 192.168.3.1 255.255.255.0 R2(config-if)#no shutdown R2(config-if)# %LINK-5-CHANGED: Interface FastEthernet0/1, changed state to up. After assigning the IP Addresses and turning on the ports, you’ll observe the link lights turning green. This represents that the port is now in forwarding mode and can be used to transmit the data. Assigning IP addresses to the PC Click on PC A and open the Desktop Tab. Go to the IP Configuration and assign IP Address 192.168.2.2 with the default subnet mask 255.255.255.0 and gateway 192.168.2.1 on PC A Click on PC B, open the Desktop Tab, and go to the IP Configuration. Assign IP address 192.168.3.2 with the default subnet mask 255.255.255.0 and gateway 192.168.3.1 Now, we are moving to probably the most exciting part. Yes, you guessed that right, configuring routing. Configure routing on Router 1 and Router 2. The main purpose or requirement of a router is to forward packets to different networks using the best path, and this purpose can be achieved by configuring routing on the router. We will configure static routes on both of the routers so that the data can be transmitted from network 192.168.2.0 to 192.168.3.0 and vice versa. Commands to add a route to 192.168.3.0 in the routing table of Router 1: R1(config)# R1(config)#ip route 192.168.3.0 255.255.255.0 192.168.1.2 Commands to add route to 192.168.2.0 in the routing table of Router 2: R2(config)# R2(config)#ip route 192.168.2.0 255.255.255.0 192.168.1.1 Checking the connectivity between devices. We will now ping from PC A to PC B to check if they can communicate. Click on PC A, go to the Desktop Tab, and click on Command Prompt. Use the command ‘ping IP Address of Destination’ Packet Tracer PC Command Line 1.0 C:\>ping 192.168.3.2 Pinging 192.168.3.2 with 32 bytes of data: Request timed out. Request timed out. Reply from 192.168.3.2: bytes=32 time<1ms TTL=126 Reply from 192.168.3.2: bytes=32 time<1ms TTL=126 Ping statistics for 192.168.3.2: Packets: Sent = 4, Received = 2, Lost = 2 (50% loss), Approximate round trip times in milli-seconds: Minimum = 0ms, Maximum = 0ms, Average = 0ms C:\> As you get a reply from the destination 192.168.3.2, we can conclude that the practical was successful, and a connection between two devices under different networks has started. So, this is how you can configure a cisco router and successfully make them communicate with each other. Step 1 – Access the router configuration mode through a terminal or web interface. Step 2 – Configure the DNS server using the command “ip name-server “, replacing with the actual IP address. Step 3 – Save the configuration using the command “write memory” to ensure the changes persist after a reboot. Router configuration refers to the process of setting up and customizing the settings of a router to meet specific requirements. It involves accessing the router’s administrative interface or command-line interface and making changes to various parameters such as network interfaces, IP addressing, routing protocols, security settings, and more. Step 1 – Access the router’s configuration mode through terminal or web-based interface. Step 1 – Open the Command Prompt by pressing Windows Key + R, typing “cmd,” and hitting Enter. You may also like – Hub vs Switch vs Router We have now covered the steps to configure a Cisco router and various other things related to Cisco Routers. Finally, installing a Cisco router may appear to be a difficult task, particularly for people who are new to networking or have limited technical understanding. However, with the appropriate approach and understanding, it is possible to turn it into a manageable work. We hope you were able to understand how to configure a router in Cisco Packet Tracer.Introduction
Cisco Router Functions
Types of Cisco Router
Wireless Router:
Wired Router:
Core Router:
Edge Router:
Virtual Router:
How to configure a Cisco Router?
Step 1: Create a Lab in Packet Tracer

Step 2: Access Command Line Interface
Step 3: Enter the Privileged EXEC Mode
Step 4: Switch to Global Configuration Mode
Step 5: Change the router name
Step 6: Assign IP Addresses

Step 7: Assign IP Address to R2

Step 8: Assign IP Address to PC

Step 9: Configure Routing
Step 10: Check connectivity

Frequently Asked Questions
Q1 – How do I add a DNS server to my Cisco router?
Q2 – What is router configuration?
Q3 – How do I configure my router IP address?
Step 2 – Identify the specific interface you want to configure (e.g., GigabitEthernet0/0).
Step 3 – Use the command “interface ” followed by “ip address ” to set the desired IP address and subnet mask. Save the configuration to ensure persistence.Q4 – How to find router IP address?
Step 2 – In the Command Prompt window, type “ipconfig” and press Enter.
Step 3 – Look for the “Default Gateway” entry under the network adapter you are currently using. The IP address listed there is your router’s IP address.Conclusion


