What is DHCP? Its Relay Agent, DORA Process and Server Configuration Explained!
DHCP stands for Dynamic Host Configuration Protocol. It is an extremely useful protocol as, without it, it becomes necessary to manually assign IP addresses for new computers and computers that are transferred from one subnet to another. So, let’s learn what is DHCP and what are DHCP Relay agents, and what DHCP DORA Process is. The DHCP protocol automatically provides this unicast IP address to each device. To learn DHCP in detail, you should join CCNA Training. Dynamic Host Configuration Protocol (DHCP) is an application layer protocol that allows a server to dynamically assign IP addresses & more information to hosts connected to LAN. DHCP is based on a client-server model and works on the discovery, offer, request, and Acknowledgement. DHCP uses the port number for: It employs UDP services and is a client-server protocol, and a pool of addresses is used to assign IP addresses. In DHCP, the client and the server exchange mainly 4 DHCP messages in order to make a connection, also called the DHCP DORA process. DORA stands for Discover, Offer, Request, Acknowledge. DHCP uses Dora Process to provide an IP Address to hosts or client machines. It collects all of the IP addresses from the central server that are accessible and gives them to hosts that want to connect to the network. When you select the option “Obtain IP automatically,” it means that a DHCP client is requesting IP to the DHCP server, and this discover request is sent out in the form of a broadcast request using 255.255.255.255 This request will reach every device in the network including DHCP server too. Header info of discovery message – Once the DHCP accepts the discover request sent by the client. The DHCP will offer some IP to the client. Header info of offer message – The client will select the IP address accordingly and request to the DHCP server that “I want to use this IP”. So, the client will send a request to use the specific selected IP. Header info of request message – The DHCP server will receive the request sent by the client machine and then acknowledge the requested IP. Header info of acknowledge message – We can deploy the DHCP server in two ways: Because whenever we configure multiple DHCP servers on one router, we have to make another router act as DHCP Relay Agent. This is only possible in the centralized deployment of DHCP because in decentralized, you always have to configure separate DHCPs for separate networks or routers. A host or router that relays DHCP packets between clients and servers is known as a DHCP relay agent. The SD-WAN equipment’ DHCP Relay feature allows network managers to relay communications between nearby DHCP Clients and a distant DHCP Server. Local hosts can obtain dynamic IP addresses from the distant DHCP Server thanks to it. After receiving DHCP messages, the relay agent creates a fresh message to broadcast on a different interface. When creating a DHCP relay agent, you must let the R-2 know the IP of the DHCP server. You can tell any IP (R-1 or R-2) 10.0.0.1 or 10.0.0.2 So, then the router won’t broadcast. It’ll unicast to the LAN 192.168.2.1 And this is how it’ll unicast, Like this – Let’s configure DHCP Lab as per the given diagram. Open R-1 & follow these commands – Step 1: First, provide the IP Address to interface Fa0/1 – 192.168.1.1 R1(config)#interface fa0/1 R1(config-if)#ip address 192.168.1.1 255.255.255.0 R1(config-if)#No shutdown Step 2: Let’s configure DHCP on R-1. R1(config)#Service DHCP (To enable DHCP Service if it’s disabled) R1(config)#IP DHCP POOL PYNETLABS R1(dhcp-config)#NETWORK 192.168.1.0 255.255.255.0 R1(dhcp-config)#DEFAULT-ROUTER 192.168.1.100 R1(dhcp-config)#DNS-SERVER 8.8.8.8 R1(dhcp-config)#DOMAIN-NAME PYNET.COM R1(dhcp-config)#EXIT R1(config)#IP DHCP EXCLUDED-ADDRESS 192.168.1.2 192.168.1.5 IP DHCP EXCLUDED ADDRESS – It refers to the exclusion on IP, which we don’t want. SERVICE DHCP – It’s only used when DHCP Service is not enabled. Now, let’s verify DHCP with our connected nodes. No IP has been assigned yet, so type DHCP on the node as we use GNS for this lab in packet tracer. You can directly click on obtain IP automatically. As we write DHCP & Press, enter DORA process will run, and these are the results we got. To Verify DHCP on R-1, use these commands: R1#Show ip dhcp pool R1#show ip dhcp binding If you want to renew IP on the host machine – PC- 1#ipconfig /release PC- 1#ipconfig /renew Now, we’ll assign IP to FA0/0 as 10.0.0.1 & 10.0.0.2 and then we’ll do static routing in both routers. Assign the same on R-2 now. Just configure only IP Addresses as of now. Now what we must understand is that to assign IPs on Network 192.168.2.0 we have to create a DHCP Relay Agent. So, now we must again go on R-1 and configure DHCP for R-2. Let’s configure DHCP on R-1 R1(config)#IP DHCP EXCLUDED-ADDRESS 192.168.2.2 192.168.2.5 Now, let’s make R-2 the DHCP Relay-Agent. R2(config)#int fa0/1 R2(config-if)#ip helper-address 10.0.0.1 And we are done here, so that’s what is known as your DHCP Relay Agent as a centralized server deployment. And now you can see the R-2 is getting the DHCP IP Addresses from the R-1, and that’s what the concept of Relay Agent is. If you are still with us, we are sure you have understood everything about DHCP and how it works. We hope you like it; please share your valuable feedback in the comment box below. If you like this blog, it would be better to subscribe to our free newsletter to never miss out on any new blogs. To help you understand DHCP better, here is the video for you to watch. You may also like – Here are some FAQs related to DHCP: Question 1 – What is DHCP and why it is used? Answer – DHCP (Dynamic Host Configuration Protocol) is an application layer protocol that allows a server to dynamically assign IP addresses & more information to hosts connected to LAN. It is used to acquire configuration information like DNS Server Addresses, IP Addresses, and a default route. Question 2 – What does DHCP and DNS do? Answer – When a device connects to a network, the Dynamic Host Configuration Protocol (DHCP) automatically assigns IP addresses and other parameters to the device. In contrast, an Internet service called the Domain Name System (DNS) converts domain names into IP addresses. Question 3 – Is DHCP same as IP address? Answer – IP Address is a combination of numbers used to verify each device connected to the network. In contrast, a DHCP is used to assign IP addresses to various devices joining the network automatically. Question 4 – What are the 4 steps of DHCP? Answer – DHCP works on the DORA Process, so the 4 steps of DHCP are: Discover, Offer, Request, and Acknowledge. It gathers all the available IP Addresses from the centralized server and provides those to hosts who want to connect to the network. You may also like – Hashing vs Encryption
What is DHCP?

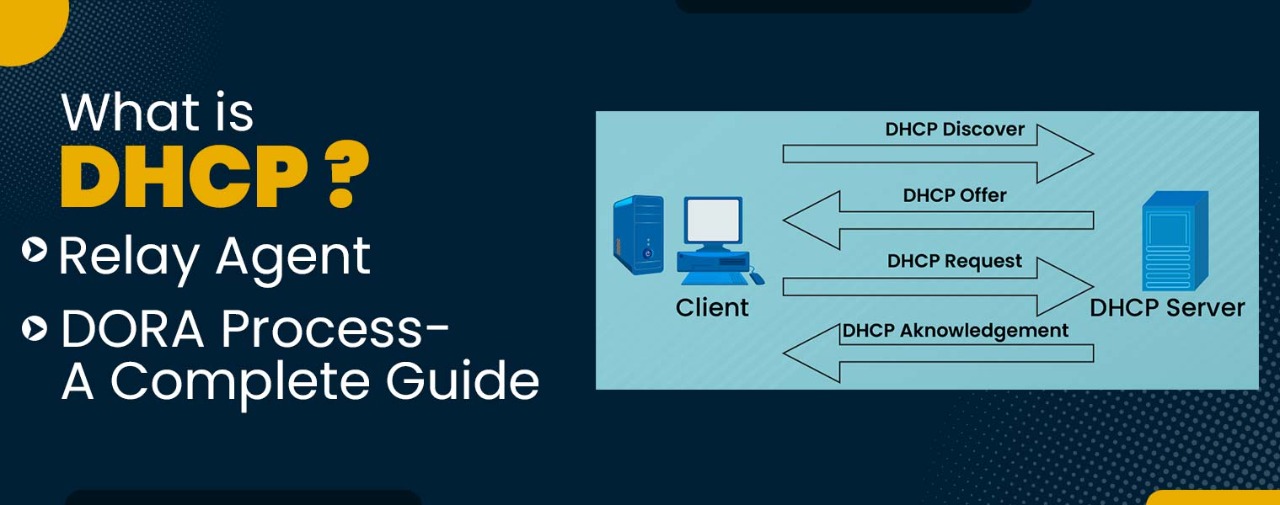
DHCP DORA Process

1. Discover
2. Offer
3. Request
4. Acknowledge
Discover Via Client using port no. 67 Offer Via server using port no. 68 Request Via Client using port no. 67 Acknowledge Via server using port no. 68 Important DHCP Terms
DHCP Server Deployment:

DHCP Relay Agent
Source IP Source Port Port No. 68 Destination IP Destination Port Port No. 67 192.168.2.1 68 10.0.0.1 67 Source IP Source Port Destination IP Destination Port 


DHCP with IPv6